I just published a new gem, inherited-attributes, for Active Record that works with the Ancestry gem to provide a tree data structure the ability to inherit attributes from their parent node, or farther up the tree. We've been using this technique for a long time to support configuring our multi-tenant application.
Once the gem is installed, its very simple to configure:
From there, you can access the effective attributes which look up the tree ancestry to find a value to inherit.
There are more options and examples in the gem, including has-one relationships, default values and support for enumerations.
We've found it helpful and writing a gem made this code much easier to test. What code do you have that would be easier to test as a gem or would be useful to others?
Wednesday, September 7, 2016
Thursday, July 7, 2016
List EC2 Instances in Hubot
I like slack. I like automating things. I hate email. Therefore, I like Hubot. I've written Hubot scripts that integrate with our ticketing system (hal ticket #6515), launch Skype calls to everybody in the channel (hal skype). Earlier this week, I added autoscaling notifications to Slack when our servers automatically scale up or down. To go along with this, I wanted to see all the servers we're currently running in EC2.
I found some scripts that did roughly what I wanted, https://github.com/yoheimuta/hubot-aws, but those scripts 1) Did more than I wanted and 2) didn't have the formatting I wanted for the ls command and 3) didn't filter in the way I wanted. Based on yoheimuta's scripts I created a new npm package, hubot-ec2, that just lists instances.
Installation is straight forward in your hubot instance:
npm install --save hubot-ec2
npm install
npm install
After installing, set 3 environment variables
HUBOT_AWS_ACCESS_KEY_ID="ACCESS_KEY"
HUBOT_AWS_SECRET_ACCESS_KEY="SECRET_ACCESS_KEY"
HUBOT_AWS_REGION="us-east-1"
HUBOT_AWS_SECRET_ACCESS_KEY="SECRET_ACCESS_KEY"
HUBOT_AWS_REGION="us-east-1"
The keys used should be a user with the IAM Policy AmazonEC2ReadOnlyAccess.
Once thats all set, deploy your bot and you've got a new command, hubot ec2 ls. You can filter by instance name hubot ec2 ls i-abcd1234 or by tag name hubot ec2 ls production-*.
It will look something like this when its all wired up:

Do you use hubot and slack? What have you done to make it awesome?
Once thats all set, deploy your bot and you've got a new command, hubot ec2 ls. You can filter by instance name hubot ec2 ls i-abcd1234 or by tag name hubot ec2 ls production-*.
It will look something like this when its all wired up:

Do you use hubot and slack? What have you done to make it awesome?
Tuesday, July 5, 2016
Posting Amazon Autoscaling Notifications to Slack
Dev-ops has become a little bit of a buzz-word, but its something I've come to embrace and enjoy; automating our infrastructure and deployments has streamlined our software development lifecycle. One piece of our infrastructure is AWS Autoscaling. With AWS Autoscaling, we can easily add new servers in response to shifting usage patterns. For instance, during the night, we might drop down to 1 server as our site quiets down and as usage grows during the day, automatically scale up to as many as 6 servers. Its been a useful cost savings measure and its also forced us to get our server provisioning correct through Ansible.
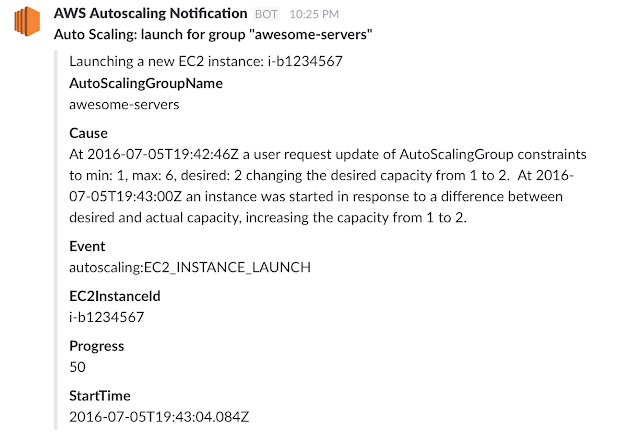
I wanted to know, via slack, when we scaled up our down. AWS doesn't provide this functionality directly, but with a few hoops, it wasn't too hard to add.
I wanted to know, via slack, when we scaled up our down. AWS doesn't provide this functionality directly, but with a few hoops, it wasn't too hard to add.
- Setup Amazon Simple Notification Service (SNS) to receive messages
- Use Amazon Lambda to transform SNS messages to Slack webhooks
- Configure Autoscaling to send SNS messages
Because we need the Lambda function before we setup the SNS endpoint, we'll do that first
Setup Lambda Function
AWS Lambda is a snippet of your code, running somewhere in the cloud. You don't manage the server and you only pay for the time you use. Lambda currently supports Java, Python and Node. We'll write a simple node script that sends an SNS message to a Slack incoming webhook.
- Login to your AWS console and find the Lambda functions
- Create a new Lambda
- Skip the blueprint selection, start with a blank script
- Give your lambda function a name (autoscaling2Slack), optional description and pick the node runtime (4.3 as of this writing)
- Configure the script below as the lambda function with your slack webhook URL
- Create a new IAM role for the lambda function (basic execution role)
Setup SNS Endpoint
With the Lambda in place, the SNS endpoint can be created.
- Login to your Amazon Console and find the SNS and create a new topic (slackSNS).
- Create a subscription to send to your Lambda function.
When you've got it setup, it should look something like this:
Send SNS messages when autoscaling occurs:
- Login to your EC2 console.
- In your autoscaling groups, add a new notification to your SNS topic.
When its setup, the ASG notifications should look something like this:
Wrapping up
I like slack and I hate email. This lets me see autoscaling notifications from an SNS message that doesn't go to email. Hopefully you've found this useful.
References
I started with this, which sends Elastic Beanstalk notifications to slack: https://medium.com/cohealo-engineering/how-set-up-a-slack-channel-to-be-an-aws-sns-subscriber-63b4d57ad3ea. The process for AWS autoscaling is _almost_ the same, but the SNS payload is different.
Friday, May 27, 2016
Popups on your Popups
We've been using Bootstrap 3 for a lot of the newer screens in our application - particularly our internal, administrator facing screens. It has been a great framework. However, the Bootstrap Modals do leave a fair amount to be desired. You have to write a lot of boilerplate code and then bootstrap has this in their documentation:
Be sure not to open a modal while another is still visible. Showing more than one modal at a time requires custom code.To avoid writing boilerplate, we've used the monkey-friendly Bootstrap Dialog javascript library from nakupanda. This makes showing a Bootstrap Modal as simple as:
Here is a JS Fiddle of the same thing showing it in action.
Some of that code comes from this Stack Overflow question and answer.
Some of that code comes from this Stack Overflow question and answer.
A few things are going on here:
Modals on top of modals are a kludge, and they aren't a great design choice, but when you need them, you need them.
- When the modal starts to show, set the visibility to hidden. Bootstrap animates the modal coming in from the top of the screen. However, the second modal animates in behind the first. So hide the modal until its completely shown.
- To make the second modal come to the foreground, the z-indexes need to be adjusted. If you dig into Bootstrap 3, you'll find the z-index of the dialog is 50000 and the background is 1030. So the new modal and back drop need to be in front of those.
- The timeout of 100 ms is probably not necessary, but in my application I am displaying an overlay spinner when the link is clicked. The 100ms makes the overlay show for a minimum amount of time.
Modals on top of modals are a kludge, and they aren't a great design choice, but when you need them, you need them.
Barf: I know we need the money, but...Maybe in the future, Bootstrap will make multiple modals easier, but I think its justifiable that multiple modals requires custom code.
Lone Starr: Listen! We're not just doing this for money!
Barf: [Barf looks at him, raises his ears]
Lone Starr: We're doing it for a SHIT LOAD of money!
Capistrano Deploys without Swap
I work on a Ruby on Rails application that is deployed with Capistrano 3 to Amazon Web Services. We monitor our site performance with New Relic. About a month ago, we noticed that our deploys were causing a delay in request processing and a drop in Apdex.
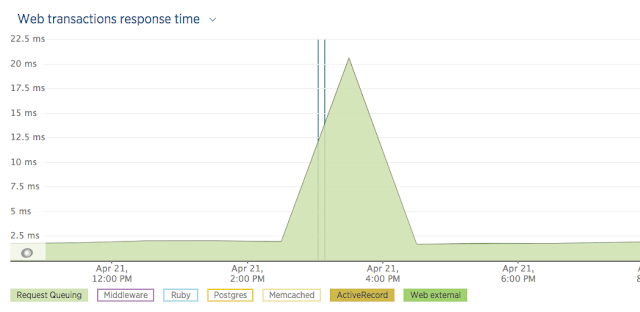
Here is an example of what we saw during a deploy. The blue vertical lines are the deploy times and the green bar is how long a request spent waiting to be processed.

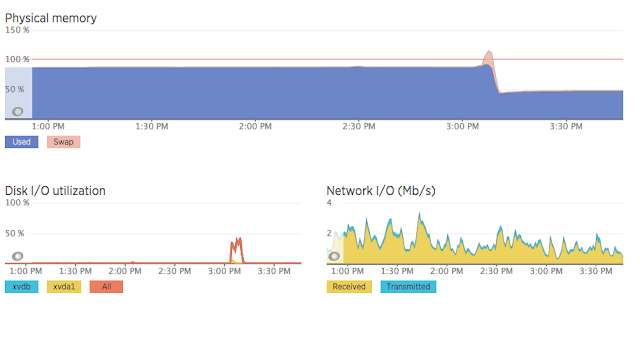
When we dug into it, we found that our servers were going into memory swap during the deploys. When we deploy with Capistrano, a new Rails process is started to pre-compile the assets. This pushes the memory usage over the physical memory limits. Here is the key graphic from New Relic. Note the swap usage just after 3:00 pm and the disk I/O at the same time.

You can see in the graph above how memory usage drops after the deploy so the solution to this was pretty straight forward: restart the servers first.
We're using Puma as our web server, so we added these lines to our deploy file. This causes a phased-restart to be sent before the deploy, freeing memory and allowing the asset compilation to have enough memory to run without using swap. Since Capistrano is based on Rake, its important to re-enable the phased-restart task after its run, otherwise it will only be run once.
Now our deploys run without causing requests to be queued. What tricks do you have for zero-impact deployments?
Here is an example of what we saw during a deploy. The blue vertical lines are the deploy times and the green bar is how long a request spent waiting to be processed.

When we dug into it, we found that our servers were going into memory swap during the deploys. When we deploy with Capistrano, a new Rails process is started to pre-compile the assets. This pushes the memory usage over the physical memory limits. Here is the key graphic from New Relic. Note the swap usage just after 3:00 pm and the disk I/O at the same time.

You can see in the graph above how memory usage drops after the deploy so the solution to this was pretty straight forward: restart the servers first.
We're using Puma as our web server, so we added these lines to our deploy file. This causes a phased-restart to be sent before the deploy, freeing memory and allowing the asset compilation to have enough memory to run without using swap. Since Capistrano is based on Rake, its important to re-enable the phased-restart task after its run, otherwise it will only be run once.
Now our deploys run without causing requests to be queued. What tricks do you have for zero-impact deployments?
Subscribe to:
Posts (Atom)


